Contents:
- Understanding Wavy Hair Structure
- The Foundation: Deep Conditioning and Moisture
- Weekly Deep Conditioning Routine
- Leave-In Conditioner Daily
- How to Bring Out Natural Curls: The Plopping Method
- Seasonal Timeline: Building Curl Over Time
- Month 1: Baseline Shift
- Month 2–3: Spring Transition
- Month 4–6: Summer Peak and Challenge
- Month 7–12: Autumn and Winter Maintenance
- Products That Reveal Hidden Curls
- Curling Gels and Creams
- Mousse and Volumisers
- Oils and Serums (Use Sparingly)
- What the Experts Know: Ecosystem Approach
- Styling Techniques That Enhance Wave-to-Curl Transformation
- Finger Coiling
- Praying Hands Method
- Diffusing with Heat
- Avoiding Common Mistakes in Curl Development
- Mistake 1: Using Wrong Products
- Mistake 2: Touching Hair While Drying
- Mistake 3: Over-Washing
- Mistake 4: Blow-Drying Straight Through
- Regional Differences in Curl Development
- Building Your Curl-Out Routine
- Daily Routine (2 minutes)
- Wash Day Routine (30 minutes)
- Weekly Deep Conditioning (20 minutes hands-on time)
- Comparison: Wavy Hair vs. Developing Curls
- Wavy Hair (Underdeveloped Curl)
- Developed Curls from Wavy Hair (After 4–8 Weeks)
- FAQ
- Can all wavy hair become curly?
- How long until wavy hair becomes curly?
- Do I have to use expensive products to bring out curl?
- Will bringing out curl change my hair permanently?
- Can heat styling ruin developing curls?
- Your Curl Transformation Timeline
Wavy hair sits between straight and curly—sometimes beautiful, sometimes frustratingly indeterminate. Many people with waves don’t realise their hair has the potential for actual curls underneath, suppressed by years of heat styling, gravity, and product neglect. The good news: you can coax those waves into genuine curls through consistent conditioning, strategic styling, and the right products. Your hair’s curl potential is there; it’s simply dormant.
Understanding Wavy Hair Structure
Hair texture is determined by follicle shape. Round follicles produce straight hair. Curved or spiral follicles produce curly hair. Wavy hair comes from slightly curved follicles that never quite form full curls on their own. However, this is misleading. Your hair might produce fuller curls than you realise—the problem is usually environmental rather than structural.
Three things suppress natural curl in wavy hair: moisture loss (curls need hydration to spring up), weight (heavy products flatten waves), and heat damage (frizz and breakage distort curl pattern). Remove these suppressors and your waves will transform into curls. This is why people say, “My curls came back after I stopped blow-drying”—they’re not exaggerating. Their curl was always there; they were just flattening it daily.
The Foundation: Deep Conditioning and Moisture
Curls are moisture machines. Without adequate water in each strand, they can’t hold shape or spring back. Wavy hair typically has lower porosity than curly hair, meaning it repels moisture. This is why your waves feel dry and limp despite conditioning.
Weekly Deep Conditioning Routine
Start with a deep conditioning mask applied for 15–20 minutes once weekly. Use products specifically formulated for curly or textured hair—standard conditioners are too light. Look for ingredients: hydrolysed protein (strengthens), glycerin (draws moisture), and plant oils (seals moisture). Aunt Jackie’s Don’t Burn My Hair mask (£2–3) is excellent for low cost. Cantu Shea Butter mask (£4–5) works well for most wave types. SheaMoisture Raw Shea Butter Restorative mask (£6–8) is professional-quality.
Leave the mask on for at least 15 minutes. For stubborn waves, apply the mask and cover your head with a shower cap, then sit under a warm towel or in a warm room. Heat opens the cuticle slightly, allowing deeper moisture penetration.
Leave-In Conditioner Daily
After shampooing, apply leave-in conditioner to soaking-wet hair. Don’t rinse it out. This keeps your hair permanently primed for curl formation. Use sparingly; too much weight flattens waves. A tablespoon for shoulder-length hair is usually sufficient. Distribute it evenly, concentrating on mid-lengths and ends. Scrunch it into your hair rather than smoothing it down.
Budget-friendly options: Cantu Leave-In Conditioner (£3–4), Shea Moisture Leave-In Conditioner (£5–6), or make your own diluted conditioner (1 part full-strength conditioner mixed with 3 parts water in a spray bottle, costs under £1 per week).
How to Bring Out Natural Curls: The Plopping Method
Plopping is non-negotiable for revealing curl. This technique removes excess water without roughing up your hair cuticle (which flattens curls). Here’s how:
- After applying leave-in conditioner to soaking-wet hair, wrap your hair in a microfibre towel or t-shirt for 10–15 minutes. This absorbs water without friction.
- Unwrap and let hair air-dry slightly (until it’s wet but not dripping).
- Gently scrunch your hair upward from the ends toward the roots using your hands. This encourages curl formation.
- If you want defined curls, use a curling cream or gel on damp hair (see product section below).
- Let air-dry completely or use a diffuser attachment on a blow-dryer set to low heat.
This method transforms wavy hair within one wash. You’ll see noticeably tighter waves the first time you plop.
Seasonal Timeline: Building Curl Over Time
Month 1: Baseline Shift
Starting your deep conditioning and plopping routine in January (winter) when humidity is lower actually works to your advantage. You’ll see how curly your hair can be without environmental help. By late January, waves should visibly tighten into definite curls, and you’ll feel motivated to continue.
Month 2–3: Spring Transition
As weather warms and humidity increases (March–April in the UK), your curls deepen further. Spring is ideal for building curl habit because improved weather and longer daylight support outdoor air-drying (which defines curl better than indoor drying). Your curls will likely look their best April–May.
Month 4–6: Summer Peak and Challenge
June–August brings high humidity, which swells the hair cuticle and makes curls frizz. Your curl will be quite defined now, but frizz management becomes important. Incorporate anti-frizz products (a dab of argan oil on dry hair) or consider protective styles (braids, buns) during peak humidity days.
Month 7–12: Autumn and Winter Maintenance
Autumn (September–October) dries the air again. Your curls might feel drier and require more frequent deep conditioning. Switch to weekly deep conditioning twice, or 2–3 times if your curls feel dry. Winter heating systems further dry curls, so increase moisture protocols November–February.
By December of your first year, you’ve moved through all seasons with new curl understanding. Your curls are now defined and you’ve learned how to maintain them year-round.
Products That Reveal Hidden Curls
Curling Gels and Creams
These products hold curl shape and define waves. Apply to soaking-wet hair, then plop and air-dry or diffuse. Budget options: Cantu Coconut Curling Cream (£3–4), Eco Styler Gel (£2–3). Premium options: DevaCurl SuperCream (£24), Kinky-Curly Knot Today (£18). For wavy-to-curly hair, budget options work perfectly. Save premium products for tight curls or when you want maximum hold.
Mousse and Volumisers
Lightweight mousse defines curl without weighing it down. Apply to wet roots and mid-lengths before diffusing. This adds lift and definition. Umberto Giannini Curl Jelly Mousse (£4) is excellent. Pantene Gold Mousse (£3) also works. These create more volume than heavier creams.
Oils and Serums (Use Sparingly)
A tiny amount of oil enhances curl shine and tames frizz without flattening. One drop of coconut oil or argan oil applied to the palm, then scrunched into dry curls, makes a dramatic difference. More than a drop flattens waves. Less is genuinely more here.
What the Experts Know: Ecosystem Approach
Professional curl specialists understand that revealing natural curl isn’t about one product or technique—it’s about creating an ecosystem where curl thrives. This means simultaneous changes: moisture (deep conditioning), support (styling products), protection (avoiding heat), and consistency (weekly routine). One change alone won’t work. Deep conditioning without plopping leaves waves flat. Plopping without leave-in conditioner leaves hair dry. Gel without moisture creates crunchy, undefined texture. The combination creates curl.
Styling Techniques That Enhance Wave-to-Curl Transformation
Finger Coiling
While your hair is wet and product-coated, wrap sections around your finger to create defined coils. This manually encourages curl pattern. Release the finger and the coil usually stays through drying. This takes 5–10 minutes total but creates noticeably tighter curls. Particularly effective on waviest sections.
Praying Hands Method
Apply gel between wet palms, then sandwich a section of hair between your hands and smooth downward. This defines curl without roughing the surface. Use this for frizz-prone sections or loose-waved areas that resist curl.
Diffusing with Heat
A diffuser attachment on low heat (not high heat) defines curl faster than air-drying while minimising heat damage. Cups the curls rather than rough-drying them. Use 30–50% power on your blow-dryer. This speeds up drying from 3–4 hours to 45–60 minutes.
Avoiding Common Mistakes in Curl Development
Mistake 1: Using Wrong Products
Standard shampoo and conditioner (designed for straight hair) flatten curls. Switch to curl-specific or textured-hair products. These have different formulations that enhance curl rather than weigh it down. This single change reveals curl most people didn’t know existed.
Mistake 2: Touching Hair While Drying
Hands in drying hair create frizz and break curl clumps. If you use a diffuser, cup curls gently—don’t move the diffuser around. Let hair dry undisturbed as much as possible. The less you touch while drying, the tighter and more defined curls appear.
Mistake 3: Over-Washing
Daily shampooing strips moisture and prevents curl development. Wash only 2–3 times weekly. Use cooler water (warm opens cuticle and releases curl moisture). Co-wash between shampoos: use conditioner only, no shampoo, to preserve moisture.
Mistake 4: Blow-Drying Straight Through
Blow-drying wave-textured hair without products or technique flattens it. If you use heat, always use a diffuser, apply curl-defining product first, and keep heat on low to medium. High heat straight-drying undoes weeks of curl development.
Regional Differences in Curl Development
The UK’s cool, moderate-humidity climate (especially Scotland and Northern England) makes curl development harder than in warmer regions. Heating systems indoors further dry curls. Your routine needs more aggressive moisture than someone in Mediterranean climate. Increase deep conditioning frequency in winter (twice weekly) and invest in room humidifiers during heating season.
London’s damp winters actually help—the ambient moisture supports curl. Highland Scotland’s dryness works against it. Coastal areas (Cornwall, Wales, Northern Ireland) have salt-air humidity that can either enhance or frizz curl depending on your specific hair. Adjust your product routine based on your local climate—more oil-based products for dry regions, lighter products for humid areas.
Building Your Curl-Out Routine
Daily Routine (2 minutes)
Spray water on your curls to rehydrate overnight-flattened sections. Apply a dab of leave-in conditioner and scrunch. If curls look good, you’re done. If they need refresh, use a curl cream and scrunch, then diffuse for 10 minutes or air-dry.
Wash Day Routine (30 minutes)
Shampoo (or co-wash). Apply deep conditioner, leave for 15 minutes minimum. Apply leave-in conditioner to soaking-wet hair. Plop for 10–15 minutes. Apply curling cream or gel and scrunch. Diffuse or air-dry.
Weekly Deep Conditioning (20 minutes hands-on time)
Once weekly, apply intensive moisture mask for 20 minutes under warmth (shower cap + warm towel). This keeps curls plump and prevents the dryness that suppresses curl pattern.
Comparison: Wavy Hair vs. Developing Curls
Wavy Hair (Underdeveloped Curl)
Appears limp or fluffy. Lacks defined shape. Looks best when wet (curl is most apparent then). Becomes flat by midday. Frizzes easily. Resists hold.
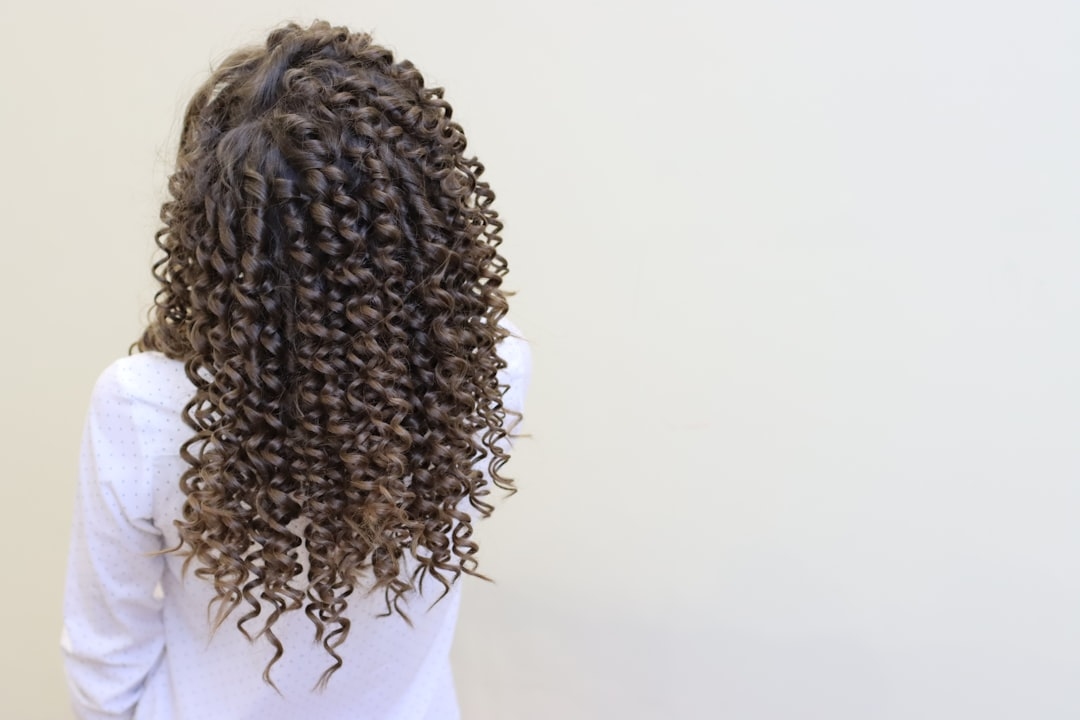
Developed Curls from Wavy Hair (After 4–8 Weeks)
Clear bounce and spring. Defined ringlets or coils. Holds shape throughout the day. Remains defined even when partially dry. Frizz becomes manageable. Responds to styling products and techniques.
FAQ
Can all wavy hair become curly?
Most wavy hair can develop tighter curl through the techniques in this article. Some waves are naturally loose and won’t become tight ringlets, but they’ll become noticeably more defined and curly than they start. The potential is there; you’re just revealing it.
How long until wavy hair becomes curly?
Visible change appears within one wash using the plopping method. More dramatic development happens over 4–8 weeks of consistent moisture and styling. Full potential may take 3–6 months as you learn your specific hair and refine technique.
Do I have to use expensive products to bring out curl?
No. Budget products work well. The technique (plopping, finger coiling, diffusing) matters more than product cost. Cantu, Aunt Jackie’s, and Eco Styler deliver results comparable to premium brands for most people. Invest in good technique first, upgrade products later if you want.
Will bringing out curl change my hair permanently?
No. If you return to straight blow-drying and skip conditioning, your curls will relax back to waves. However, consistently using curl-supporting methods trains your hair into a new pattern. After 6–12 months of curl-focused care, your hair remembers the curl pattern and holds it more easily.
Can heat styling ruin developing curls?
Yes. High-heat blow-drying straight through will flatten curls. However, low-heat diffusing actually helps define curl. Flat irons and curling irons damage developing curl. Avoid these until your curl is well-established (3+ months). Then use heat sparingly and always with heat protection.
Your Curl Transformation Timeline
Week 1: Purchase deep conditioning mask and leave-in conditioner (total cost: £5–10). Use these alongside your existing shampoo. Start plopping on wash day. Expect to see slightly more defined waves immediately.
Weeks 2–4: Add curling cream or gel (£3–5). Start finger coiling sections while damp. You’ll see actual curls forming, not just waves.
Month 2: Refine your routine based on results. You’ve committed 4 weeks and likely see clear curl development. Continue consistency.
Months 3–6: Your curls have “memory” now and hold shape more easily even with minimal styling. You understand your specific curl pattern and can predict what it needs. Curl is fully developed.
Beyond Month 6: You’re maintaining established curl with routine care. This becomes your normal hair, not a special project.
The transformation from wavy to curly hair is real, achievable, and begins the moment you prioritise moisture and proper technique. Your hair has the potential already—you’re simply creating the conditions for that potential to express itself.